


Installing ReviewX on your WordPress website is a quick, straightforward process. Whether you downloaded the official plugin package from WordPress.org or received your licensed distribution from the ReviewX Client Portal, uploading the plugin via a .zip archive allows you to get up and running in less than two minutes.
Thank you for reading this post, don't forget to subscribe!This guide walks you through the step-by-step process of uploading, installing, and activating ReviewX via the WordPress administrative dashboard, along with troubleshooting tips for common server upload errors.
System Requirements Check
Before uploading, ensure your server meets modern WordPress standards: PHP 7.4 or higher (PHP 8.1+ recommended), WordPress 5.8+, and WooCommerce 5.0+ installed and active.
Step-by-Step Guide: Installing ReviewX via Zip File
Step 1: Download the Plugin Archive
Ensure you have downloaded the official reviewx.zip archive file to your computer. Do not unzip or extract the archive before uploading; WordPress requires the zipped package.
Step 2: Navigate to Plugins Add New
Log in to your WordPress admin dashboard and navigate to Plugins → Add New.
Step 3: Open the Upload Plugin Screen
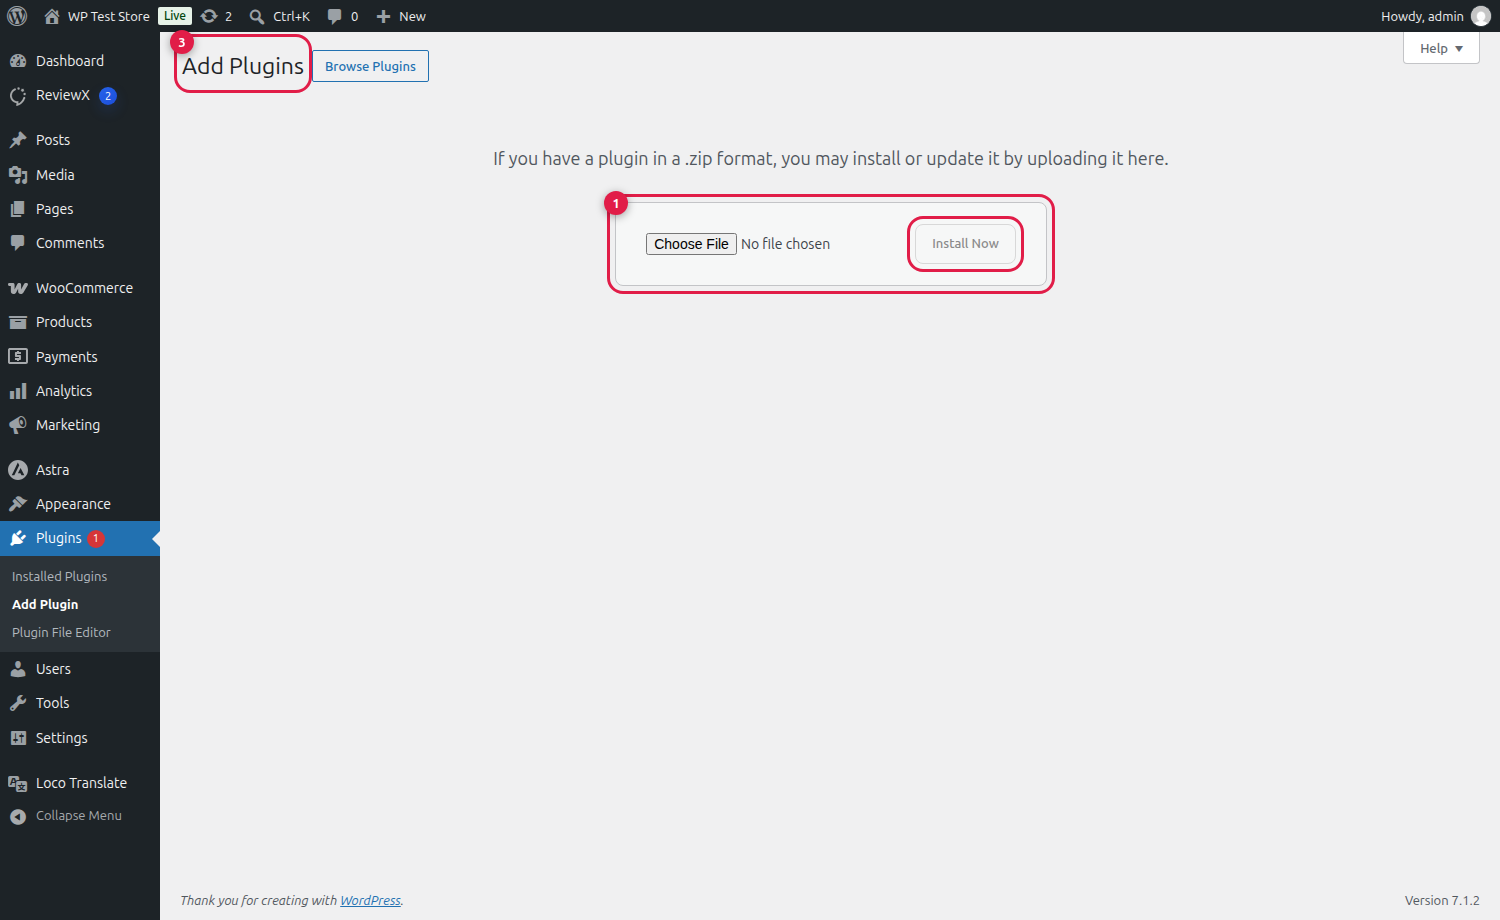
At the top of the Add Plugins page, click the Upload Plugin button (marked with Badge 3 in the screenshot above). This reveals the file upload dropzone.
Step 4: Choose the File and Install
Inside the upload container:
- Click the Choose File button (Badge 1) and locate the
reviewx.zipfile on your computer. - Click the Install Now button (Badge 2). WordPress will upload the archive, unpack the package, and install ReviewX into your
wp-content/plugins/directory.
Step 5: Activate the Plugin
Once installation finishes, click the blue Activate Plugin button on the confirmation screen. ReviewX will initialize its database tables and automatically launch the setup onboarding wizard.
Troubleshooting Common Zip Upload Issues
| Error Message | Root Cause | Solution |
|---|---|---|
| The uploaded file exceeds the upload_max_filesize directive | Server PHP upload limit is set lower than the zip file size (e.g., 2MB). | Increase upload_max_filesize and post_max_size to 64MB in php.ini or your hosting control panel. |
| Destination folder already exists | An older installation of ReviewX exists in wp-content/plugins/reviewx. |
Click “Replace current with uploaded” or delete the older folder via FTP before uploading. |
| Are you sure you want to do this? / Link expired | PHP execution timeout during upload transfer. | Increase max_execution_time to 300 seconds in your PHP settings. |
Next Steps: The Onboarding Wizard
Upon activation, ReviewX automatically guides you through four quick setup steps:
- Brand Identity & Layout: Choose your primary accent color and review widget layout style.
- Review Criteria: Select multi-criteria ratings tailored to your store catalog.
- Visual Reviews: Enable photo and video review attachments.
- Automated Reminders: Configure post-purchase review request schedules.
Frequently Asked Questions
Do I need to install a separate zip file for ReviewX Pro?
No. ReviewX uses a unified codebase. The same reviewx.zip powers both Free and Pro. Entering your Pro license key unlocks all premium features instantly without secondary plugins.
Can I install ReviewX directly from the WordPress repository?
Yes. In Plugins → Add New, search for “ReviewX” and click Install Now → Activate to install directly from WordPress.org without manual file downloads.
Will installing via zip overwrite my existing customer reviews?
No. Customer reviews are stored securely in your WordPress database (wp_comments and wp_commentmeta). Reinstalling or updating the plugin never touches your review data.


