


Automated review requests, discount coupons, and admin notification emails must reliably land in your customers’ inboxes rather than getting flagged as spam. ReviewX includes a built-in Custom SMTP engine that routes all emails through your authenticated mail server (such as Google Workspace, SendGrid, Mailgun, or your web host’s SMTP).
Thank you for reading this post, don't forget to subscribe!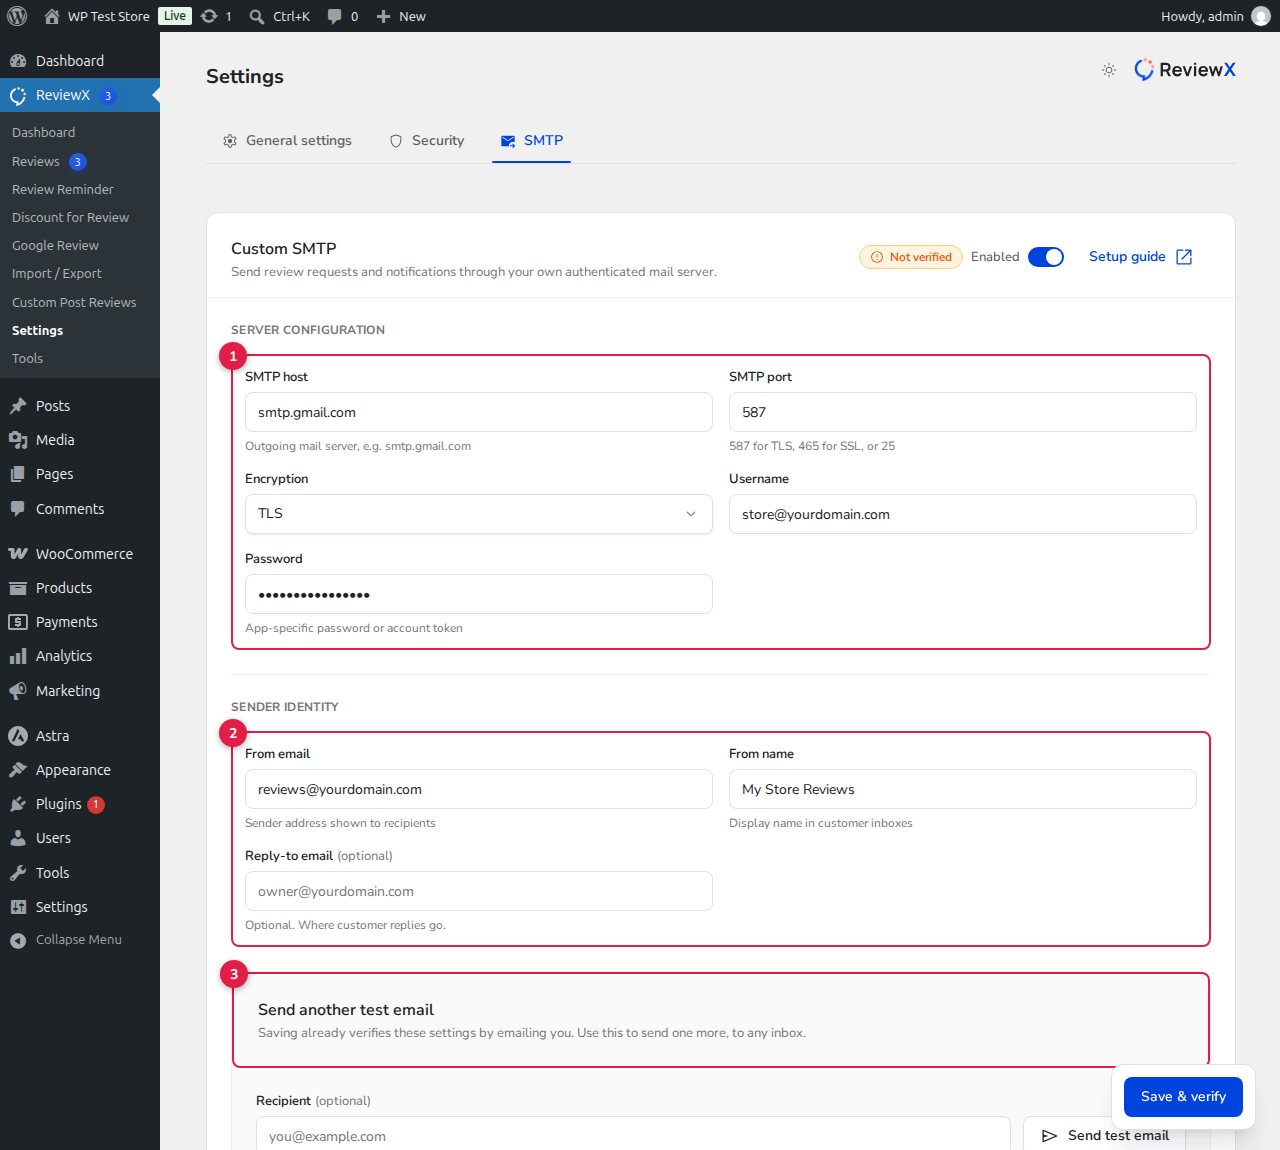
Why Use Custom SMTP?
Default WordPress emails rely on the standard PHP mail() function, which frequently lacks SPF, DKIM, and DMARC alignment. As a result, major email providers like Gmail, Yahoo, and Outlook often send review requests straight to the spam folder. Using authenticated SMTP guarantees high deliverability, domain alignment, and consistent open rates.
Step-by-Step Configuration
- In your WordPress admin menu, navigate to ReviewX → Settings.
- Click the SMTP tab.
- Toggle the switch next to Custom SMTP to Enabled.
- Fill in the Server configuration section [1]:
- SMTP host: Your outgoing mail server address (e.g.
smtp.gmail.comfor Google,smtp.sendgrid.netfor SendGrid, or your cPanel host). - SMTP port: Enter
587for TLS encryption or465for SSL encryption. - Encryption: Select TLS or SSL from the dropdown.
- Username: Your full email address or SMTP service API username.
- Password: Your email password or generated App Password / API key.
- SMTP host: Your outgoing mail server address (e.g.
- Fill in the Sender identity section [2]:
- From email: The sender address shown to customers (e.g.
reviews@yourdomain.com). Note: This must match your authenticated SMTP account domain. - From name: The brand or store name displayed in the customer’s inbox (e.g. My Store Reviews).
- Reply-to email: (Optional) An alternate inbox where customer replies should be directed (e.g.
support@yourdomain.com).
- From email: The sender address shown to customers (e.g.
- Click the blue Save & verify button in the bottom floating toolbar. ReviewX will automatically authenticate with your mail server and update the verification badge to Verified.
Step 3: Send a Test Email Verification
Once saved, use the Send another test email card [3] to verify real-world inbox delivery:
- Enter any target email address in the Recipient field (or leave blank to send to your WordPress administrator email).
- Click Send test email.
- Check the destination inbox to confirm receipt of the ReviewX verification message.
Common SMTP Provider Settings
| Provider | SMTP Host | Port | Encryption |
|---|---|---|---|
| Google Workspace / Gmail | smtp.gmail.com |
587 | TLS (Use App Password) |
| SendGrid | smtp.sendgrid.net |
587 | TLS (Username: apikey) |
| Mailgun | smtp.mailgun.org |
587 | TLS |
| Amazon SES | email-smtp.us-east-1.amazonaws.com |
587 | TLS |


